

Every Halloween season stirs up a delightful blend of excitement and nostalgia, as families gather to celebrate spookiness with treats that spark joy. My Halloween Cookies and Cream Cheesecake is an essential part of this festive tradition, combining creamy textures with delicious chunks of Halloween Oreos for a treat that’s downright irresistible. The no-bake option is perfect for busy days, allowing you to whip up this festive dessert effortlessly, while its decadent chocolate crust will have your friends and family clamoring for seconds. Imagine the delight on everyone’s faces when they bite into fluffy whipped cream ghosts perched atop this creamy masterpiece! Intrigued about how to bring this treat to life? Let’s dive into the recipe that’ll make your Halloween the sweetest one yet!
Why Is This Cheesecake a Must-Make?
Festive Fun: This Halloween Cookies and Cream Cheesecake is not just a dessert; it’s a spooky centerpiece that brings the festive spirit right to your table.
Effortless Preparation: With the option to make it as a no-bake treat, this cheesecake is perfect for those busy days when you want to impress without the stress.
Decadent Chocolate Crust: The rich and chocolatey crust provides a perfect contrast to the creamy filling, making each bite a delightful experience, reminiscent of the best bakery cheesecakes.
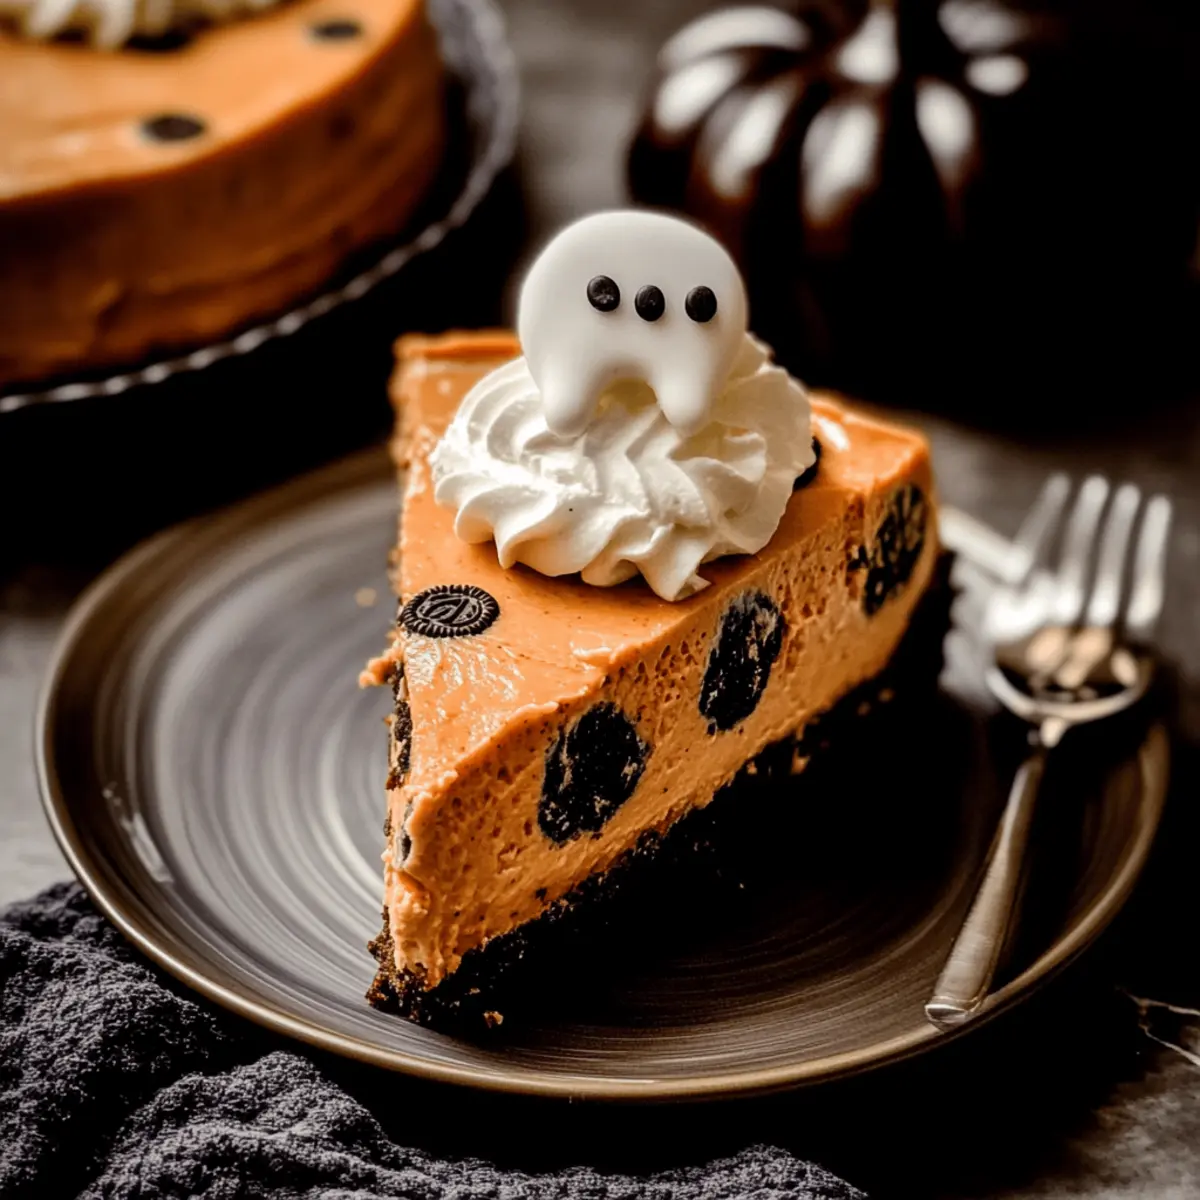
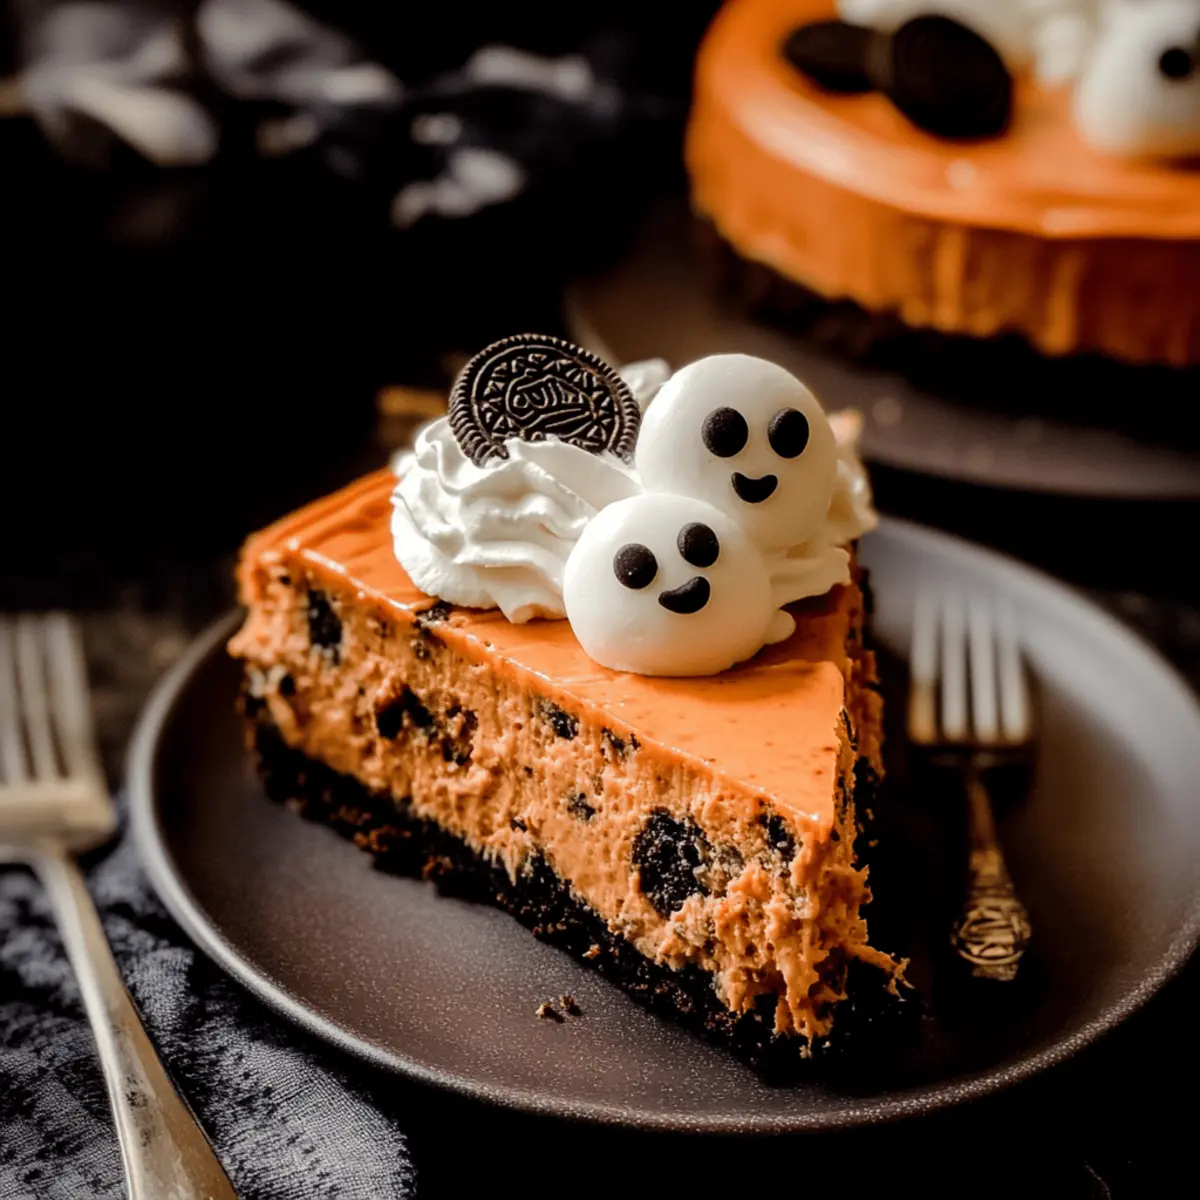
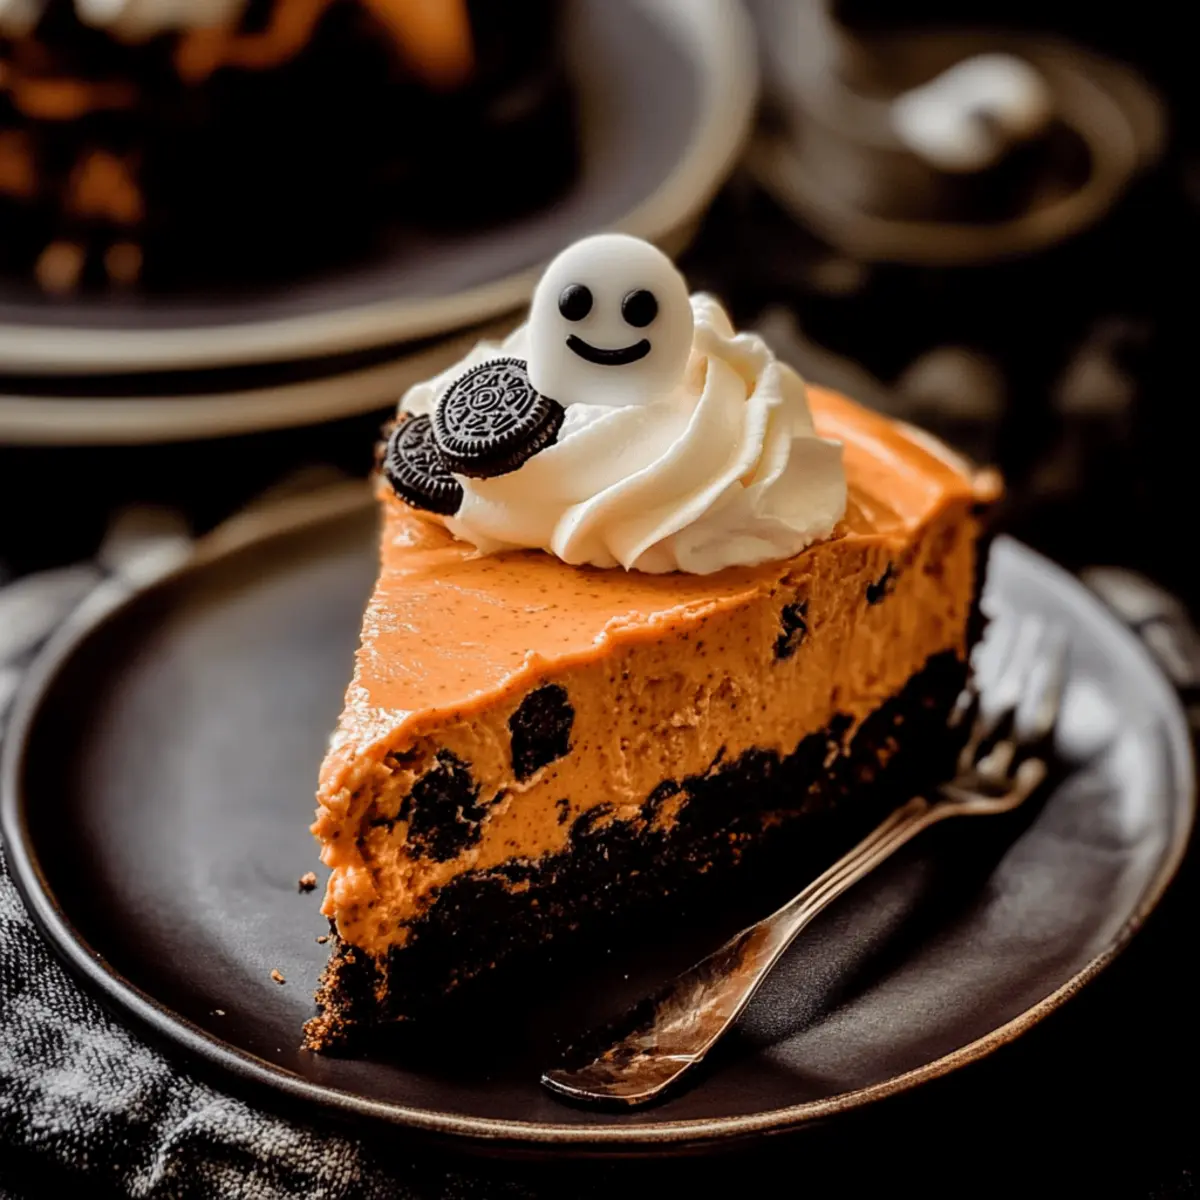
Surprising Toppings: The whipped cream ghosts on top are not just adorable; they add a fun and whimsical touch that will wow your guests, making dessert truly memorable!
Crowd Pleaser: Whether it’s a Halloween party or a cozy family gathering, this cheesecake is bound to keep everyone coming back for more—just like my Fireworks Oreo Cheesecake does!
Versatile Base: Feel free to play with flavors and textures; you could add a fruit swirl or pumpkin pie spice for a seasonal twist to make it truly one-of-a-kind.
Halloween Cheesecake Ingredients
-
For the Crust
• Oreos (20 whole + 14 chopped) – A delicious base for our cheesecake; substitute with regular Oreos if desired.
• Unsalted Butter (1/4 cup, melted) – Binds the crust together beautifully; coconut oil is a great dairy-free alternative. -
For the Filling
• Cream Cheese (32 ounces) – The heart of our cheesecake; ensure it’s softened for smooth mixing.
• Granulated Sugar (1 cup) – Sweetens the cheesecake; brown sugar offers a deeper flavor profile if preferred.
• Heavy Whipping Cream (1/4 cup) – Adds a luscious richness; use coconut cream for a dairy-free version.
• Greek Yogurt or Sour Cream (5 ounces) – Provides a tangy balance; can use cream cheese in a pinch.
• Vanilla Extract (1 tablespoon) – Boosts overall flavor; stick to pure vanilla for the best taste.
• Orange Food Coloring – Gives a fun Halloween hue; optional if you prefer a classic look.
• Eggs (4 large + 2 egg yolks) – Essential for structure and stability in your cheesecake. -
For the Topping
• Homemade Whipped Cream (1 cup) – Perfect for decoration; sprinkle with powdered sugar for added sweetness if desired.
This Halloween Cheesecake is sure to become a delightful star of your festive gatherings!
Step‑by‑Step Instructions for Halloween Cookies and Cream Cheesecake
Step 1: Prepare the Crust
Preheat your oven to 325°F (162°C) and spray a 9-inch springform pan with nonstick spray. Crush 20 Oreos into fine crumbs in a food processor, then mix with melted butter until well combined. Press this mixture firmly into the bottom of the prepared springform pan and bake for 8-10 minutes until set. Remove the crust from the oven and allow it to cool completely.
Step 2: Make the Cheesecake Filling
In a large mixing bowl, beat the softened cream cheese with an electric mixer on medium speed until smooth and creamy. Gradually add granulated sugar and continue mixing until fully incorporated. Slowly drizzle in the heavy whipping cream, yogurt, vanilla extract, and orange food coloring, mixing until just smooth. Add the eggs one at a time, mixing briefly after each addition. Finally, gently fold in the chopped Oreos to the mixture.
Step 3: Bake the Cheesecake
Prepare a water bath by placing the springform pan into a larger baking dish. Pour hot water into the outer pan until it comes halfway up the sides of the springform pan. Place the cheesecake in the preheated oven and bake for 1 hour 35 minutes to 1 hour 50 minutes, or until the center is set but slightly jiggly. The internal temperature should reach 145°F (63°C) for perfect doneness.
Step 4: Cooling Process
Once baked, turn off the oven and leave the cheesecake inside for an additional hour to cool gradually. After that, move the cheesecake to a cooling rack and let it cool to room temperature for about 2 hours. Cover the cheesecake and refrigerate for at least 6 hours, or preferably overnight, to allow it to firm up and develop its flavors.
Step 5: Decorate
When ready to serve your Halloween Cookies and Cream Cheesecake, carefully remove it from the fridge. Loosen the sides of the springform pan and gently release the cheesecake. Top with homemade whipped cream, creating adorable whipped cream ghosts, and use candy eyes to add a fun touch. Serve and enjoy this spooky masterpiece at your Halloween celebration!
Halloween Cheesecake Variations & Substitutions
Feel free to customize this delightful cheesecake to match your family’s preferences or to experiment with fun flavors!
-
Dairy-Free: Substitute cream cheese and heavy cream with vegan cream cheese and coconut cream for a tasty dairy-free version.
This option allows the same creamy texture and flavors to shine through, perfect for those avoiding dairy products. -
Gluten-Free: Use gluten-free Oreos for the crust and filling, making it a scrumptious treat for gluten-sensitive guests!
Everyone can join in on the spooky fun without worrying about dietary restrictions. -
Pumpkin Spice: Add 1 teaspoon of pumpkin pie spice to the filling for a seasonal twist that’s bursting with fall flavors.
The warm spice will enhance the cookies and cream flavor, taking this cheesecake to the next level of deliciousness! -
Nutty Crust: Swap Oreos with crushed pecans or almonds for the crust. This adds a delightful crunch and nutty richness.
Not only does it change the flavor, but it also adds an interesting texture to this spooky dessert. -
Cocoa Powder: Mix in 2 tablespoons of cocoa powder to the crust for a double chocolate treat!
Chocolate lovers will rejoice at the extra depth of flavor, making this dessert even more irresistible. -
Caramel Drizzle: Drizzle caramel sauce over the top before serving for a sweet, gooey finish.
This will elevate your cheesecake to a dessert masterpiece that everyone will swoon over! -
No-Bake Option: For an easier version, skip the baking step and let the cheesecake set in the fridge.
It will come out just as creamy and delicious, perfect for busy days leading up to Halloween! -
Mini Cheesecakes: Use a muffin tin to create individual mini cheesecakes for easy serving at your Halloween parties.
They’re adorable and perfectly portioned, making them a hit with both kids and adults alike!
For even more delicious cheesecake inspiration, check out my Strawberry Cheesecake Bars or dive into the layers of amazing flavor with my Brownie Bottom Cheesecake.
What to Serve with Halloween Cookies and Cream Cheesecake
Elevate your spooky dessert experience with delightful accompaniments that enhance the creamy, festive flavors of this Halloween cheesecake.
-
Spooky Fruit Salad: A vibrant mix of seasonal fruits like oranges, grapes, and blackberries adds a refreshing touch to balance the rich cheesecake.
-
Crispy Caramel Apples: These sweet treats bring a crunchy element, perfect for pairing with the cheesecake’s smooth texture while keeping in theme with Halloween treats.
-
Chocolate Drizzle: A drizzle of warm chocolate sauce over your cheesecake creates an indulgent contrast, making each bite even more decadent.
-
Festive Whipped Cream: Serve with a dollop of spiced whipped cream to amplify the flavors and add an extra festive flair to your spooky dessert presentation.
-
Pumpkin Spice Latte: This warm, spiced beverage contrasts nicely with the cheesecake’s coolness, creating a cozy and inviting atmosphere during chilly fall gatherings.
-
Candied Pecans: Add a crunch factor with these sweet, buttery bits. They complement the cheesecake beautifully while introducing nutty flavors that echo the rich creaminess of your dessert.
Indulging in these delightful pairings will ensure your Halloween gathering is a memorable one, full of fun and flavors everyone will love!
Expert Tips for Halloween Cheesecake
-
Room Temperature Ingredients: Ensure all ingredients are at room temperature for a smooth batter, helping to create a creamy texture in your Halloween cheesecake.
-
Avoid Overmixing: When adding eggs, mix just until combined. Overmixing can lead to a cheesecake that cracks or becomes too dense.
-
Perfect Water Bath: Use a water bath during baking to prevent cracks and maintain even baking. This moisture is key to a smooth cheesecake.
-
Cooling Time Matters: Don’t rush the cooling process; letting the cheesecake cool gradually in the oven helps prevent cracking, ensuring a beautifully smooth finish.
-
Chill Overnight: For best flavor and texture, refrigerate the cheesecake overnight. This allows it to set properly and enhances the creamy filling.
Make Ahead Options
These Halloween Cookies and Cream Cheesecake are perfect for busy cooks looking to streamline their meal prep! You can prepare the crust and filling up to 24 hours in advance and refrigerate them separately to maintain freshness. Simply bake the crust and allow it to cool completely, then mix your cheesecake filling and store it in an airtight container. When you’re ready to bake, just pour the filling over the chilled crust and follow the usual baking instructions. This way, you’ll save time and enjoy a deliciously rich cheesecake with fantastic flavor that tastes just as delightful as if it were made fresh that day!
How to Store and Freeze Halloween Cheesecake
Fridge: Store your Halloween cheesecake in an airtight container in the refrigerator for up to 5 days. This helps to maintain its creamy texture and delightful flavor.
Freezer: If you’d like to keep it longer, wrap individual slices in plastic wrap and place them in a freezer-safe bag or container. This cheesecake can be frozen for up to 3 months.
Thawing: To enjoy your frozen Halloween cheesecake, transfer it to the fridge for several hours or overnight to thaw slowly while preserving its creaminess.
Reheating: While not typically necessary, if you prefer it slightly warmed, simply let it sit at room temperature for 20-30 minutes before serving.
Halloween Cookies and Cream Cheesecake Recipe FAQs
How do I choose the right Oreos for this cheesecake?
Absolutely! For the best flavor, I recommend using the Halloween-themed Oreos, which are perfect for adding some festive flair with their unique orange filling. However, regular Oreos work just as well if you prefer a classic flavor. Just make sure they’re crisp and intact for the best results!
What’s the best way to store leftover cheesecake?
You can store your Halloween cheesecake in an airtight container in the refrigerator for up to 5 days. This keeps it fresh and maintains its creamy texture. If you want to keep it longer, wrap individual slices tightly in plastic wrap and place them in a freezer-safe bag or container to freeze for up to 3 months.
Can I freeze the Halloween cheesecake?
Certainly! To freeze your cheesecake, first, slice it into individual portions. Wrap each slice in plastic wrap, then place them in a freezer-safe bag or container. This will help maintain its flavor and texture, allowing you to enjoy it later. When you’re ready to dive in, simply transfer it to the fridge to thaw for several hours or overnight.
What should I do if my cheesecake cracks while baking?
If your cheesecake cracks, it’s usually due to overmixing or a sudden temperature change. To prevent cracks, always mix the batter gently after adding the eggs. Additionally, make sure to cool the cheesecake gradually with the oven door ajar for an hour after baking. This helps avoid rapid cooling that can lead to unsightly cracks. If it happens, don’t worry—just cover it with whipped cream ghosts for a spooky disguise!
Is this cheesecake safe for people with dairy allergies?
Great question! While this Halloween cheesecake does contain cream cheese and heavy cream, you can modify the recipe to make it dairy-free. Substitute the cream cheese with a dairy-free cream cheese alternative and use coconut cream instead of heavy cream. Just be sure to check the labels for any hidden allergens.
What if I don’t have a springform pan?
No worries! If you don’t have a springform pan, you can use a regular cake pan lined with parchment paper. Just be sure to leave some overhang so you can lift the cheesecake out easily after it sets. You can also run a knife around the edge to help release it—just go carefully!

Irresistible Halloween Cheesecake with Spooky Whipped Cream
Ingredients
Equipment
Method
- Preheat your oven to 325°F (162°C) and spray a 9-inch springform pan with nonstick spray. Crush 20 Oreos into fine crumbs in a food processor, then mix with melted butter until well combined. Press this mixture firmly into the bottom of the prepared springform pan and bake for 8-10 minutes until set. Remove the crust from the oven and allow it to cool completely.
- In a large mixing bowl, beat the softened cream cheese with an electric mixer on medium speed until smooth. Gradually add granulated sugar and continue mixing until fully incorporated. Slowly drizzle in the heavy whipping cream, yogurt, vanilla extract, and orange food coloring, mixing until just smooth. Add the eggs one at a time, mixing briefly after each addition. Finally, gently fold in the chopped Oreos.
- Prepare a water bath by placing the springform pan into a larger baking dish. Pour hot water into the outer pan until it comes halfway up the sides of the springform pan. Place the cheesecake in the preheated oven and bake for 1 hour 35 minutes to 1 hour 50 minutes, or until the center is set but slightly jiggly.
- Once baked, turn off the oven and leave the cheesecake inside for an additional hour to cool gradually. After that, move the cheesecake to a cooling rack and let it cool to room temperature for about 2 hours. Cover the cheesecake and refrigerate for at least 6 hours, or preferably overnight, to allow it to firm up and develop its flavors.
- When ready to serve, carefully remove the cheesecake from the fridge. Loosen the sides of the springform pan and gently release the cheesecake. Top with homemade whipped cream, creating adorable whipped cream ghosts, and use candy eyes to add a fun touch.