

“Can you believe it? Cookie Monster cookies exist!” Someone casually exclaimed during a recent gathering, and just like that, I felt inspired to create a batch of these whimsical delights. Bright blue, soft, and stuffed with Oreos, these Cookie Monster Cookies are the ultimate crowd-pleasers, perfect for parties or any day you want to brighten someone’s mood. Not only do they bring a splash of color to your dessert table, but they are also incredibly easy to make—no complicated techniques here! Just whip up the dough, incorporate your favorite cookie center, and bake. Who wouldn’t love a gooey surprise hidden inside a thick, chewy cookie? Whether you’re baking with kids or just indulging your inner child, these cookies are bound to make everyone smile. Curious about how to whip up this delightful treat that’s sure to wow your family and friends? Let’s dive into the recipe!

Why Are Cookie Monster Cookies So Fun?
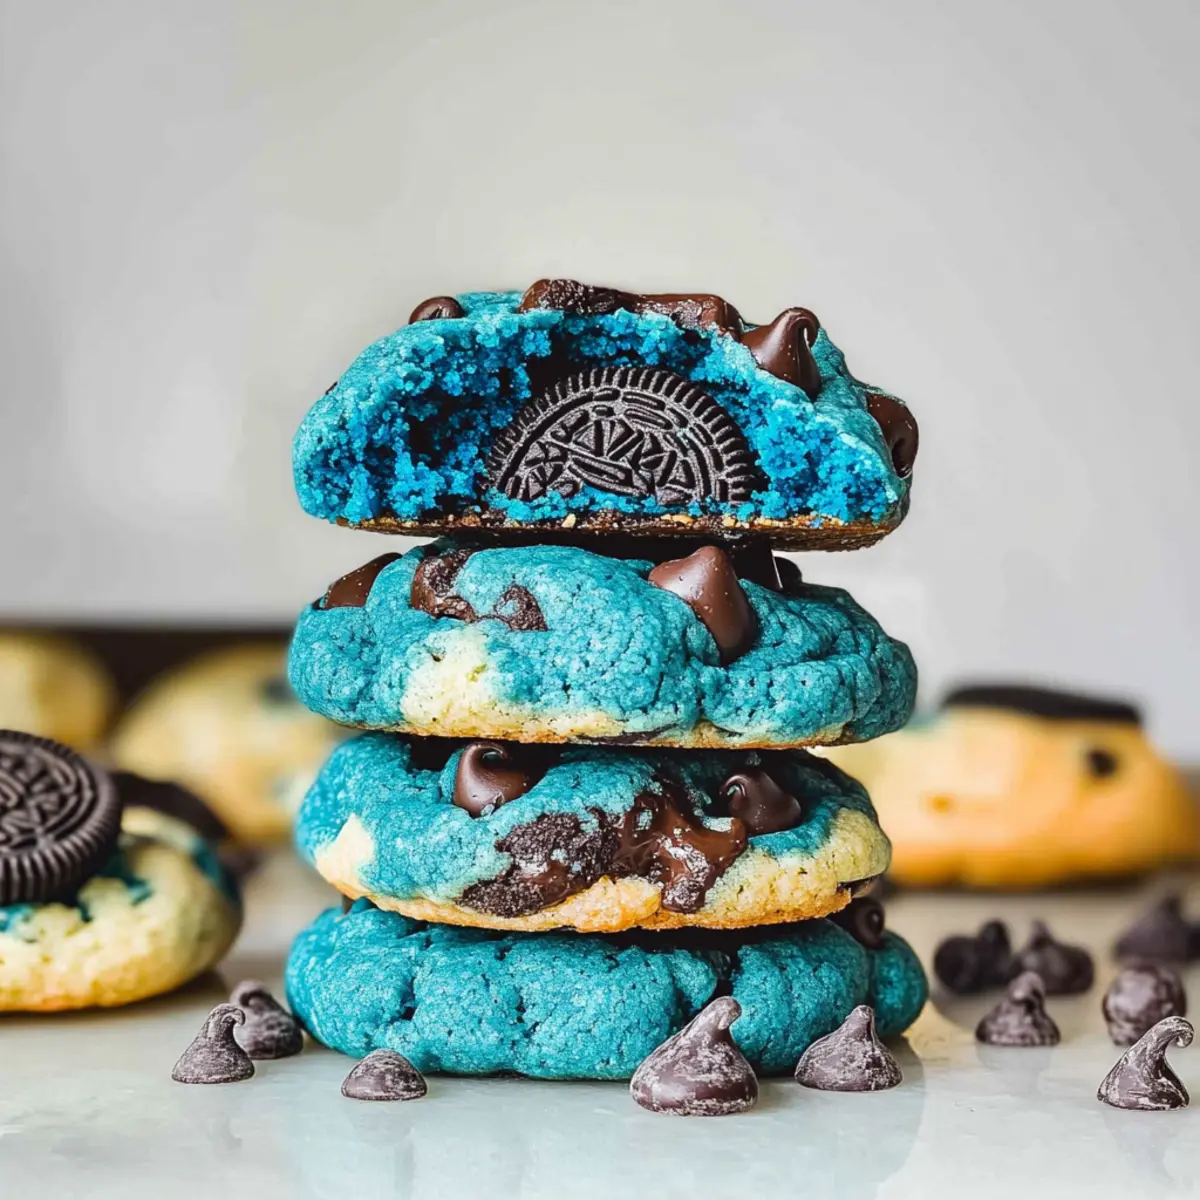
Bright, Vibrant Color: The dazzling blue dough instantly draws attention, making these cookies a hit at any gathering.
Gooey Surprise: Each cookie features a delicious Oreo center, adding a fun twist to the classic treat.
Easy to Make: With simple ingredients and straightforward steps, even novice bakers can create these delightful cookies.
Endless Variations: Feel free to customize with your favorite cookie fillings or colors to suit any occasion, just like in Birthday Cake Cookies or Coffee Cake Cookies.
Perfect for Sharing: These cookies are ideal for parties, bake sales, or just a fun family treat that everyone will adore!
Cookie Monster Cookies Ingredients
-
For the Dough
-
Butter – Provides richness and moisture; substitute with margarine for dairy-free options.
-
Brown Sugar – Adds sweetness and depth of flavor; can replace with white sugar for a lighter taste.
-
Granulated Sugar – Sweetens while contributing to the chewy texture of these Cookie Monster cookies.
-
Egg – Binds ingredients and adds moisture; use a flax egg for a vegan alternative.
-
Vanilla Extract – Enhances flavor; almond extract can offer a delightful twist if desired.
-
Blue Gel Food Coloring – Gives the cookies their signature bright blue color; omit for a more traditional look.
-
All-Purpose Flour – The main structure component; gluten-free flour can be used for a GF version.
-
Baking Powder & Baking Soda – Leavening agents that help the cookies rise; ensure they are fresh for optimal results.
-
Salt – Balances the sweetness and enhances overall flavor; don’t skip it!
-
For the Mix-Ins
-
Chocolate Chips – Adds bursts of chocolate flavor; consider using dark chocolate chips for a richer taste.
-
Mini Cookie Pieces – Contributes fun texture; can substitute with any cookie of your choice.
-
Oreo Cookies – The star of the show; they add a gooey surprise center; feel free to use other filled cookies like Biscoff for variety.
With these ingredients, you’re ready to create whimsical Cookie Monster cookies that will leave everyone grinning!
Step‑by‑Step Instructions for Cookie Monster Cookies
Step 1: Prep the Dough
Start by creaming 1 cup of softened butter with 1 cup of brown sugar and 1 cup of granulated sugar in a large mixing bowl. Beat for about 1-2 minutes until the mixture is smooth and fluffy. Next, add one large egg, 1 teaspoon of vanilla extract, and several drops of blue gel food coloring, mixing until well combined and the dough takes on a vibrant shade of blue.
Step 2: Combine Dry Ingredients
In a separate bowl, whisk together 3 cups of all-purpose flour, 1 teaspoon of baking powder, 1 teaspoon of baking soda, and ½ teaspoon of salt. Gradually fold this dry mixture into the wet ingredients you prepared earlier, stirring gently until just combined. Be cautious not to over-mix; this will help create the chewy texture of the Cookie Monster cookies.
Step 3: Add Mix-ins
Gently fold in 1 cup of chocolate chips, 1 cup of mini cookie pieces, and roughly chopped Oreos to your cookie dough. Use a spatula to ensure the mix-ins are evenly distributed throughout the bright blue dough without overworking it. The combination of these toppings will add delightful texture and flavor to your vibrant cookies!
Step 4: Shape Cookies
Take about 2 tablespoons of dough and flatten it in your palm. Place a whole Oreo cookie in the center, then carefully wrap the dough around it, ensuring the Oreo is completely enclosed. This will create the signature gooey surprise inside each of your Cookie Monster cookies, so make sure it’s sealed well for the best results.
Step 5: Chill the Dough
Once shaped, place your cookie dough balls on a tray lined with parchment paper. Cover them with plastic wrap and chill the dough in the refrigerator for at least 30 minutes, or you can speed up the process by placing them in the freezer for 15-20 minutes. Chilling allows the cookies to hold their shape when baking and prevents excessive spreading.
Step 6: Bake
Preheat your oven to 350°F (180°C) while the dough chills. After chilling, arrange the dough balls on a baking sheet, leaving enough space between them. Bake for 12-15 minutes, until the edges are lightly golden but the centers remain soft. The visual cue here is to look for a slightly puffy cookie shape with a soft center.
Step 7: Cool
Remove the cookies from the oven and let them sit on the baking tray for about 5 minutes. This allows them to set before transferring them to a wire rack. Once on the rack, let your Cookie Monster cookies cool completely, which will enhance their texture and flavor as they settle into soft, chewy perfection.

Expert Tips for Cookie Monster Cookies
-
Chill the Dough: Always chill the dough before baking. This crucial step ensures your colorful Cookie Monster cookies maintain their thickness and avoid spreading too much.
-
Accurate Measurements: Use a kitchen scale to measure flour. Too much flour can lead to dry cookies. Precision helps achieve that gooey, chewy texture you crave!
-
Gentle Mixing: When incorporating chocolate chips and Oreos, fold gently. Over-mixing can make the dough tough and affect the final cookie’s texture.
-
Fresh Leaveners: Check the freshness of your baking powder and baking soda. Using expired leavening agents can result in flat cookies, so ensure they’re active!
-
Cookie Variations: Experiment with different mix-ins, like nuts or candy pieces, to customize your Cookie Monster cookies. Each variation can bring a new and delightful surprise!
What to Serve with Cookie Monster Cookies
If you’re planning a gathering, why not elevate your Cookie Monster cookies experience with delightful sides and treats that enhance the fun?
- Milkshakes: Creamy and indulgent, a vanilla or chocolate milkshake pairs beautifully, complementing the cookies’ sweetness and creating a nostalgic dessert vibe.
- Colorful Fruit Salad: A refreshing mix of strawberries, blueberries, and kiwi adds brightness to the table, contrasting the rich flavors of the cookies perfectly. Each bite provides a crisp, juicy texture that balances the gooey cookies.
- Ice Cream Sundaes: Top with a scoop of vanilla or blue raspberry ice cream and drizzle with chocolate sauce for a delightful, over-the-top treat that echoes the cookie’s fun personality.
- Chocolate-Covered Strawberries: These classic treats draw attention with their elegance while contrasting the playful nature of the cookies, making for a visually stunning dessert spread.
- Party Punch: Create a whimsical drink by mixing fruit juice with sparkling water and a splash of blue food coloring, echoing the cookie theme while refreshing guests throughout the gathering.
- Brownies: Rich, fudgy brownies can offer a delightful texture contrast. Their chocolatey goodness creates a perfect pairing with the vibrant Cookie Monster cookies, enticing anyone with a sweet tooth.
- Popcorn Bar: Set up a popcorn station with toppings like chocolate drizzle, sprinkles, and candy pieces for a fun, interactive treat that invites guests to customize their own flavors to enjoy alongside the cookies.
Cookie Monster Cookies Variations
Feel free to unleash your creativity and customize these delightful cookies just the way you like them!
- Gluten-Free: Use a 1:1 gluten-free flour blend to make these cookies accessible for everyone.
- Dairy-Free: Substitute butter with coconut oil or margarine for a vegan-friendly treat.
- Different Colors: Try using pink, green, or even rainbow food coloring for festive occasions, just to keep things lively!
- Nutty Addition: Add chopped nuts like walnuts or pecans for a crunch that contrasts beautifully with the soft cookie.
- Candy Explosion: Fold in candy pieces or M&M’s for an extra layer of sweetness and a fun crunch.
- Spicy Kick: Mix in a pinch of cayenne or cinnamon to add a subtle warmth to your cookies.
- Less Sweet: Decrease the sugar by ¼ cup if you prefer a less sweet cookie, balancing the flavors perfectly.
- Chocolate Lovers: Use double the chocolate chips or include white chocolate chips for extra indulgence—mixing different chocolates can create a rich experience.
Explore these variations just like you would in other fun dessert recipes, such as Style Oreo Cookies or Coffee Cake Cookies. There’s no limit to how you can make these Cookie Monster cookies uniquely yours!
Storage Tips for Cookie Monster Cookies
- Room Temperature: Store cooled cookies in an airtight container for up to 1 week. This keeps them fresh and chewy, perfect for snacking!
- Fridge: If you prefer a firmer texture, place the cookies in the fridge for up to 1 week. Just remember to let them come to room temperature before enjoying!
- Freezer: Freeze the cookie dough balls for up to 3 months; simply thaw them overnight in the fridge before baking fresh Cookie Monster cookies whenever the craving strikes.
- Reheating: To warm cookies, pop them in the microwave for about 10-15 seconds. This revives the gooey Oreo center and makes them feel freshly baked again!
Make Ahead Options
These Cookie Monster Cookies are perfect for busy home cooks looking to save time! You can prepare the dough up to 24 hours in advance. Simply follow steps 1-4 to create your cookie balls, then chill them as per step 5 before storing them in an airtight container in the refrigerator. If you need them for later, you can also freeze the shaped dough balls for up to 3 months—just be sure to wrap them tightly to prevent freezer burn. When you’re ready to bake, there’s no need to thaw; simply place them directly into the preheated oven, adding an extra minute or two to the baking time for frozen dough. This way, you can easily whip up a batch of delicious, colorful Cookie Monster Cookies anytime!

Cookie Monster Cookies Recipe FAQs
How do I choose the right ingredients for Cookie Monster Cookies?
Absolutely! For the best results, use fresh ingredients. When selecting butter, aim for unsalted for better control over salt levels. Eggs should be large and fresh for optimal binding. It’s critical to check the expiration dates on your baking powder and soda; using fresh leavening agents ensures your cookies rise perfectly.
What’s the best way to store Cookie Monster Cookies?
To keep your cookies fresh, store them in an airtight container at room temperature for up to 1 week. If you prefer, you can refrigerate them, but remember they’ll become firmer; let them sit out for a few minutes before enjoying. If you want to keep them longer, freeze them! Place the cooled cookies in a freezer bag for up to 3 months, making it a breeze to enjoy a cookie treat anytime.
Can I freeze the Cookie Monster cookie dough?
Yes, you can! This is a fantastic option for easy baking later. Form the cookie dough balls as outlined in the recipe, then place them on a baking sheet lined with parchment paper and freeze until solid. Afterward, transfer the frozen dough balls to a freezer-safe bag for up to 3 months. When you’re ready to bake, just pull them out, thaw in the fridge overnight, and bake as directed—fresh cookies will be yours in no time!
What should I do if my Cookie Monster Cookies spread too much while baking?
If your cookies are spreading excessively, first check your flour measurement—too little can cause this. Always weigh your flour for accuracy. Also, ensure your dough is adequately chilled before baking; if it feels too soft, a little more time in the fridge won’t hurt. Lastly, avoid over-mixing your dough, as this can impact the texture and structure of the cookies.
Are Cookie Monster Cookies suitable for people with allergies?
Great question! This recipe contains common allergens like eggs, dairy, and gluten. If you’re baking for someone with dietary restrictions, consider alternatives: use a flax egg for a vegan version, and opt for gluten-free flour to make them suitable for gluten-sensitive individuals. Always check labels on your mix-ins, like chocolate chips or Oreos, to ensure they don’t contain any unwanted allergens!
Can I customize my Cookie Monster Cookies?
Very much so! These cookies are incredibly versatile. Feel free to swap out the Oreo filling with your favorite cookies, like Biscoff or even peanut butter cookies. You can also experiment with different colors of gel food coloring for various occasions—think pastel colors for springtime or vibrant hues for birthday parties. The more the merrier!
Cookie Monster Cookies: Chewy, Colorful Treats Everyone Loves
Ingredients
Equipment
Method
- Start by creaming butter, brown sugar, and granulated sugar in a mixing bowl until smooth and fluffy.
- Add the egg, vanilla extract, and blue gel food coloring, mixing until combined.
- In a separate bowl, whisk together the dry ingredients: flour, baking powder, baking soda, and salt.
- Gradually fold the dry mixture into the wet ingredients until just combined.
- Gently fold in the chocolate chips, mini cookie pieces, and chopped Oreos.
- Flatten dough in your palm, place a whole Oreo in the center, and wrap the dough around it.
- Chill the dough balls on a tray lined with parchment for at least 30 minutes.
- Preheat your oven to 350°F (180°C), then bake the cookies for 12-15 minutes.
- Let the cookies cool on a baking tray for 5 minutes before transferring to a wire rack.